How To: Deploy a Simple Java Web Service with AWS Lambda and API Gateway
AWS is incredible technology, making it easy for anyone to deploy a web service without needing to worry about managing servers. In this quick tutorial, we’re going to see how to deploy a simple web service to AWS Lambda and make that service available on the internet with AWS API Gateway. Let’s get started.
Start with a Seed
AWS supports Node.js, Python, Java, and C#. For this tutorial, we’ll be using Java. As an example, we’re going to write a web service that can add two numbers and return the result. What it does isn’t important - we’re focusing on the setup here. The easiest way to start is by cloning a seed project to put the framework in place. We’ll use my AWS Java Seed, available on Github. (Warning: As of 2020, this seed is a couple years old and hasn’t been updated. Consider finding a newer seed, or at least upgrade to newer versions of the software after getting started.)
$ git clone git@github.com:mkasberg/aws-lambda-java-template.git
At this point, if you want, you can remove the origin remote from your
repository clone, since we won’t be pushing our code back to it (git remote
remove origin).
Write Some Code
Open the project in your favorite Java IDE (I’m using
IntelliJ). The project uses Maven for
dependency management (see pom.xml), and already includes the dependencies you
need to get started with AWS Lambda. Let’s run the compile target now (mvn
compile). The code should compile without errors. Let’s also run the tests
(mvn test). The API seed comes with a single test, which should pass.
Now let’s dig into the code a bit. The Application class is a great place to
start. Application#handleRequest() is the method that will be called when our
Lambda service receives a request (forwarded from API gateway). We can parse the
inputStream into a JSONObject, and the URL parameters will be under the
queryStringParameters key. Let’s write some code to add the numbers that are
sent to our service on URL parameters a and b. Here’s our new
handleRequest() method:
public void handleRequest(InputStream inputStream, OutputStream outputStream, Context context) throws IOException {
    JSONObject requestJson = new JSONObject(new JSONTokener(inputStream));
    JSONObject responseJson = new JSONObject();
    JSONObject responseBody = new JSONObject();

    // Headers
    JSONObject headerJson = new JSONObject();
    headerJson.put("Content-Type", "application/json");

    try {
        JSONObject params = requestJson.getJSONObject("queryStringParameters");

        int result = params.getInt("a") + params.getInt("b");
        responseBody.put("result", result);
        responseJson.put("statusCode", "200");
    } catch (JSONException e) {
        responseBody.put("status", "error");
        responseBody.put("message", "Send numbers to be added on URL parameters a & b.");
        responseJson.put("statusCode", "400");
    }

    // Assemble the response.
    responseJson.put("body", responseBody.toString());
    responseJson.put("headers", headerJson);

    OutputStreamWriter writer = new OutputStreamWriter(outputStream, "UTF-8");
    writer.write(responseJson.toString());
    writer.close();
}
Unit tests are an important part of a codebase, and this tutorial wouldn’t be
complete without tests for the code we modified. If we run our unit tests now,
they’ll fail. It is easy for us to write unit tests to ensure that our code will
work when it comes time to deploy. We’ll unit test the public handleRequest()
method by mocking the input and output streams with byte array streams. We’ll
also test a request that’s missing some parameters. Again, the framework to get
this started comes with the seed project, so we only have to change a little
code.
public class ApplicationTest {

    @Test
    public void testHandleRequest() throws Exception {
        Application app = new Application();

        InputStream lambdaRequest = new ByteArrayInputStream(
                "{\"queryStringParameters\":{\"a\":2,\"b\":3}}".getBytes()
        );
        ByteArrayOutputStream lambdaResponse = new ByteArrayOutputStream();
        Context context = mock(Context.class);

        app.handleRequest(lambdaRequest, lambdaResponse, context);

        byte[] byteArray = lambdaResponse.toByteArray();
        assertEquals(
            "{\"headers\":{\"Content-Type\":\"application/json\"},\"body\":\"{\\\"result\\\":5}\",\"statusCode\":\"200\"}",
            new String(byteArray)
        );
    }

    @Test
    public void testBadRequest() throws Exception {
        Application app = new Application();

        InputStream lambdaRequest = new ByteArrayInputStream(
                "{\"queryStringParameters\":{\"a\":2}}".getBytes()
        );
        ByteArrayOutputStream lambdaResponse = new ByteArrayOutputStream();
        Context context = mock(Context.class);

        app.handleRequest(lambdaRequest, lambdaResponse, context);

        byte[] byteArray = lambdaResponse.toByteArray();
        assertEquals(
                "{\"headers\":{\"Content-Type\":\"application/json\"},\"body\":\"{\\\"message\\\":\\\"Send numbers to be added on URL parameters a & b.\\\",\\\"status\\\":\\\"error\\\"}\",\"statusCode\":\"400\"}",
                new String(byteArray)
        );
    }
}
Package and Deploy the Lambda Application
Our tests are passing! Let’s package the application into a deployable jar. This
is easy - just use the Maven package step (mvn package).
After creating the jar, deploy it to AWS:
- Sign in to the AWS Console and navigate to AWS Lambda.
- Hit the “Create Function” button.
- Choose “Author from Scratch”.
- Add a trigger, and select “API Gateway” as the trigger mechanism.
- Name your API Gateway. Leave the deployment stage at “prod”, and select an “Open” security mechanism for now.
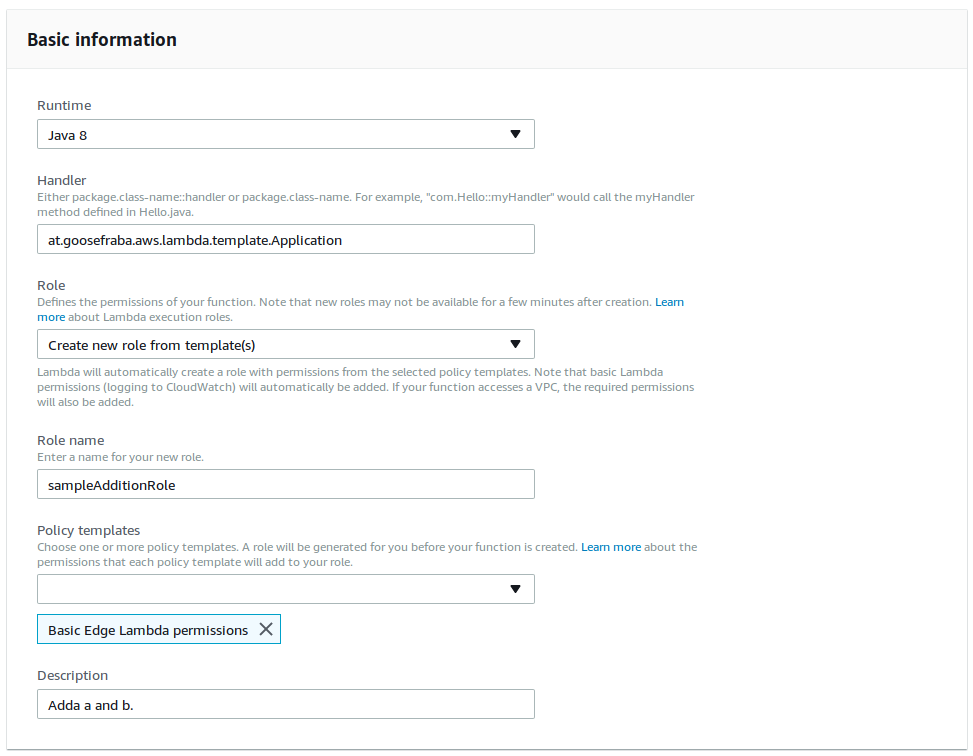
- Give your new Lambda function a name (like “Addition Lambda”) and description. Make sure to choose “Java 8” as the runtime.
- Use the upload button to upload a jar, and upload
“aws-lambda-java-template-0.0.1.jar” (or similar if you renamed your project)
from the
targetfolder. - Enter
at.goosefraba.aws.lambda.template.Application(or similar if you renamed your project) as the handler. -
Create a new role for your lambda function from an existing template. “Basic Edge Lambda permissions” should be sufficient.
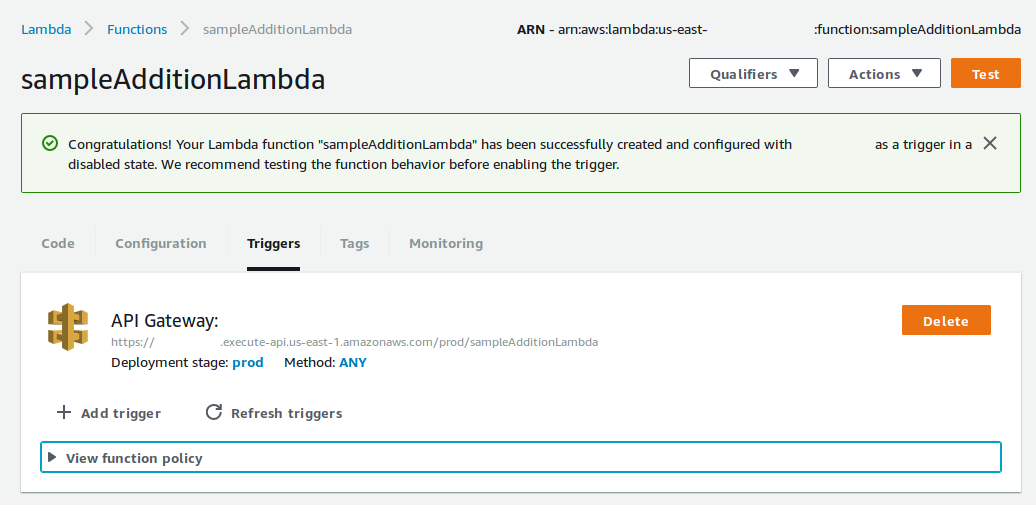
- Hit the “Create Function” button to finish creating your function.
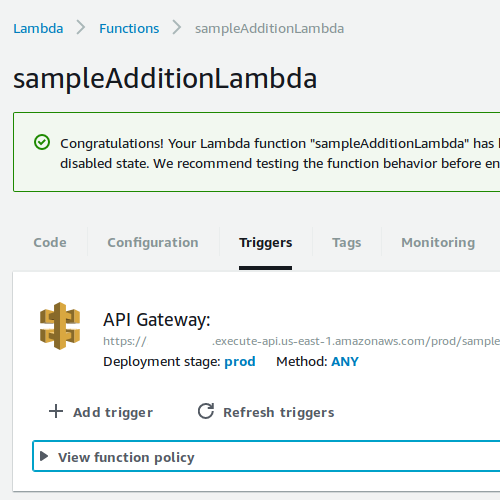
- That’s it! You should see a public URL under your API Gateway. Let’s use this
URL to test our function.
We can see our function work by visiting the public URL and providing a and
b as URL parameters.

About the Author

👋 Hi, I'm Mike! I'm a husband, I'm a father, and I'm a staff software engineer at Strava. I use Ubuntu Linux daily at work and at home. And I enjoy writing about Linux, open source, programming, 3D printing, tech, and other random topics. I'd love to have you follow me on X or LinkedIn to show your support and see when I write new content!
I run this blog in my spare time. There's no need to pay to access any of the content on this site, but if you find my content useful and would like to show your support, buying me a coffee is a small gesture to let me know what you like and encourage me to write more great content!
You can also support me by visiting LinuxLaptopPrices.com, a website I run as a side project.
Related Posts
- Automated Jekyll Deployments 08 Nov 2016
- Analyzing Static Website Logs with AWStats 09 Dec 2023
- Code Reuse and Simplicity 23 Jul 2018