Learning to Solder: A WLED Project
I’ve been thinking for a while that it would be fun to add some kind of color-changing LED mood lighting to my home office. As I was researching different products, I quickly stumbled across the WLED project. WLED was immediately appealing to me because of my love for open source software. It’s highly praised on various blogs and YouTube videos, and I was confident that the software quality I’d get with WLED (and its ability to integrate with things like apps and Home Assistant) would be better than almost anything I could find off the shelf. I was excited to build something with WLED, but I ran into a small stumbling block – most of the hardware that’s compatible with WLED requires soldering electronics components together.
Though I’ve been programming since before I was ten, I never learned to solder or work with electronics components. Sure, I’m comfortable changing the RAM in a laptop, but that’s pretty much the extent of my hardware knowledge. I’ve always felt a little bit limited in the kinds of projects I could tackle because I’ve always been too intimidated to work with electronics components (like LEDs, GPIO, Arduinos, etc) and DC circuits. Looking back, I wish I’d taken some kind of hardware-focused electronics course in high school or college to give me the foundational knowledge I need to explore more on my own. In any case, I’ve learned over the years that the best way to get comfortable with something is to just try to do it. You might make some mistakes along the way, but the knowledge gained far outweighs the mistakes and there’s no better way to learn something! So I decided to dive in head-first and figure out how to make a WLED-compatible LED strip, teaching myself to solder along the way.
Research & Shopping
With little knowledge of DC circuits, I began reading a lot, and started shopping for parts. The first thing I shopped for, naturally, was an LED strip. This in itself is a confusing task. I knew I wanted an addressable LED strip since the full power of WLED requires changing the color of each LED independently for cool effects. The WLED Compatibility page lists more than a dozen different kinds of addressable LED strips, but doesn’t link anywhere and doesn’t really provide any info about which ones to use or where to buy them. After a couple days of research, I settled on WS2812Bs – mainly because they seemed very common. They also happen to be the underlying tech for Adafruit’s NeoPixels. Though I wasn’t planning to work with NeoPixels specifically, I found the NeoPixel Überguide very informative as I was teaching myself about LEDs.
You can type “WS2812B” into Amazon and find a variety of different sellers. Fundamentally, all WS2812Bs are the same, but different brands and sellers might have varying degrees of quality. Perhaps more important than the brand is the water resistance rating (IP), LED spacing, and length. The LED strips on Amazon aren’t a terrible deal, but you can buy the exact same thing for less on AliExpress if you’re willing to wait for slower shipping. I bought a 5m WS2812B strip with 60 LEDs/m, IP30 for $9.15 with $1.00 shipping on AliExpress from BTF Lighting (which seems to have a good reputation for quality LEDs). The same product would have been about $20 on Amazon. I won’t use the full 5m, but you can cut these anywhere and use the rest later.
Now, you can’t buy an LED strip like this and just plug it into the wall. The LED strip has leads for power and a data signal. I needed a controller to run the WLED software and control the lights. Shopping for a controller is probably more confusing than shopping for an LED strip! The WLED Controllers Wiki lists more than 35 different options with WLED pre-installed, as well as additional DIY options. I skimmed through many of these options, but I found most of the controllers to be confusing, poorly documented, overpriced, or unavailable. The diagram at the top of the WLED Controllers Wiki showed a simple setup with an ESP8266 dev board, and I began researching this option instead of a pre-installed controller. If I’m going to use WLED and learn as I go, I might as well get the full DIY experience! Much like LED strips, you can find ESP8266 dev boards on Amazon, but I found them much cheaper on AliExpress. I ordered two WeMos D1 Mini ESP8266 dev boards for $5.11 total. (Ordering two got me free shipping!) I later found out that this board, the WeMos D1 Mini, is Aircoookie’s recommendation (the maintainer of WLED) if you want to use an ESP8266 board, so I guess I did my research well!
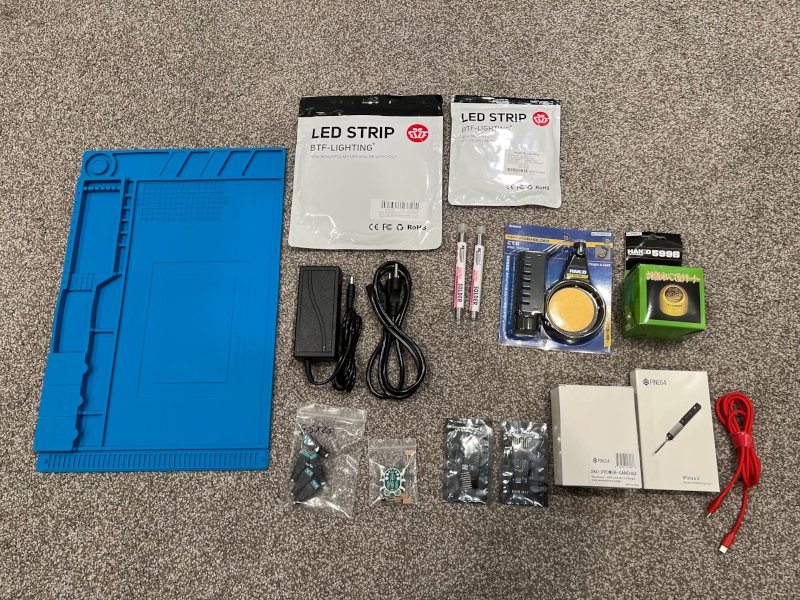
Besides the dev board and LED strip, I also needed some some other parts and tools. Electronics hobbyists might have this stuff laying around, but I didn’t have anything since this was my first foray into tinkering with electronics. I bought some 18 AWG wire and a 5V/6A power supply from AliExpress. To calculate the size of power supply and wire that I’d need, I used this WLED Power Calculator, and rounded up where I was unsure, to be safe. The WLED Power Calculator shows diagrams that include a fuse, but this QuinLED fuses page suggested fuses might not be necessary when the power produced by my power supply is close to the power used by the system (since the power supply itself should act as a fuse if the system draws too much current). For this relatively small project, I opted not to add additional fuses to my circuit.
As I was gathering all the supplies I’d need, I realized I didn’t really have a good plan for connecting all the components. I’d originally imagined I’d just solder some wires directly to the board, but doing so would make it difficult to experiment and hard to fix any mistakes I made. I noticed that some people were using breadboards in the YouTube videos I was watching, and I decided to go with this approach myself after realizing I could buy a breadboard for a couple dollars. Using a breadboard with jumper cables would allow me to test things before making permanent connections. While learning about breadboards, I also discovered the MB102 power module, which would give me a great way to connect my power supply to the bread board and the rest of my components. I bought a MB102 breadboard kit from AliExpress that came with a small breadboard, jumper wires, and a MB102 power module, all for about $4.
Running LED strips with WLED is a deep, deep rabbit hole. Over and over again, I’d start feeling comfortable with my design, only to discover several new factors I hadn’t previously considered. One such experience was learning about voltage level shifters. While the basic wiring diagram with an ESP8266 dev board on the WLED Wiki omits level shifters, my research suggested that LED strips with longer distances between the LED strip and board could suffer from flickering (or just not work at all) because the ESP8266 produces a 3.3V data signal but the LED expects a 5V data signal. At short distances, the signal produced by the board is within the tolerance and works fine, but at longer distances the voltage drop from the wire can put the data signal strength out of tolerance. Fortunately, I also discovered an easy solution to this problem that uses a sacrificial pixel, and I decided to try that solution before doing anything more complicated. (It turned out to work great!)
Having learned a lot about LED strips, I was feeling increasingly confident in assembling working LEDs with all the right components, but I was nervous about my ability to solder. Even with a bread board, I’d need to solder to connect header pins to my D1 Mini, or to splice some wires together. I wanted to practice soldering on a smaller project before working on my LEDs.
Learning to Solder
I spent a little bit of time learning about soldering irons, and I decided to purchase a Pine64 Pinecil This soldering iron was not only highly recommended, but also priced reasonably. As an added bonus (for me), it runs open source firmware. In addition to the soldering iron, I bought a silicone work mat from AliExpress and some MG Chemicals 60/40 Rosin Leaded Solder from Amazon.
I watched a couple YouTube videos like this one to learn the fundamentals of soldering. To find a small board to practice on, I typed “solder practice board” into AliExpress and came across a practice board called a Weevil Eye. For a few dollars, it included a little PCB, some LEDS, and other electrical components to solder together for practice. (I later realized that SparkFun, a US company, sells the Weevil Eye and I’d actually bought a clone on AliExpress – I’d encourage you to buy from SparkFun if you want to try this project yourself.) The practice board was exactly what I needed to try soldering for the first time on a low-stakes project.
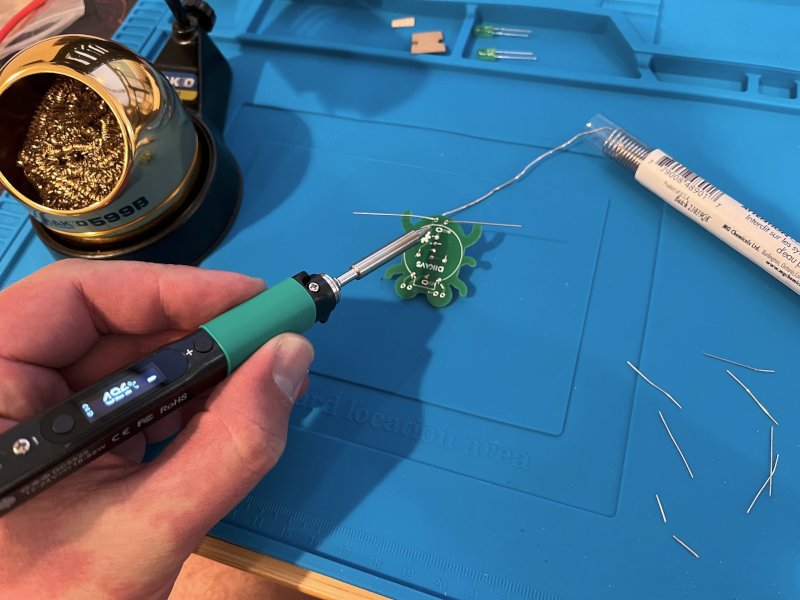
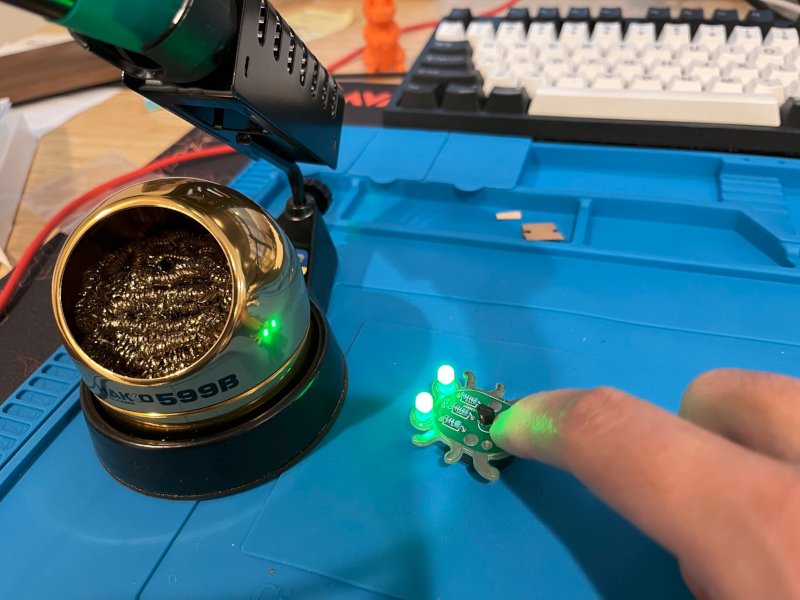
My Weevil Eye turned out great! I learned most of what I know about soldering from wermy’s YouTube Crash Course, so I’d highly recommend it if you want to learn to solder yourself. My connections were solid, looked clean, and worked flawlessly! Soldering requires a little coordination and practice, but I think anyone who’s motivated can learn to do it pretty quickly!
WLED with an ESP8266 Dev Board
With my practice project complete, and feeling much more confident about soldering, I was excited to start my real project – getting WLED working on an ESP8266 dev board with WS2812B LEDs! I installed WLED to my D1 Mini dev board using the WLED Web Installer. This was really easy, but I did need to install a CH340 driver to get my computer to recognize the device. The online WLED installer tool configures the WiFi connection for the device as part of the installation, so right after installing the software I was able to visit my device at its IP address and see the WLED interface. Seeing the WLED interface on my computer confirmed that the D1 Mini was powered on, that WLED was running correctly, and that the network was set up right! I was pleasantly surprised at how painless the whole process was!
With the WLED software installed on the D1 Mini, it was time to wire things up. Even with a breadboard, some soldering was required. I soldered some header pins to the D1 Mini so I could use it on the breadboard. I also soldered some wires to a single LED (cut from my strip), and tinned the other ends of the wires to use them with the breadboard. This LED would ultimately become my sacrificial pixel, but I first wanted to use it to test my setup with just a single LED. I attached everything to the breadboard and used jumper wires to make the connections, setting up a circuit like the one described on the WLED Wiki. It was really exciting to turn this on and see my LED light up, confirming that I was able to power the device using my 5V power supply (rather than a USB cable), connect to the web interface via WiFi, and change the colors of my LED!
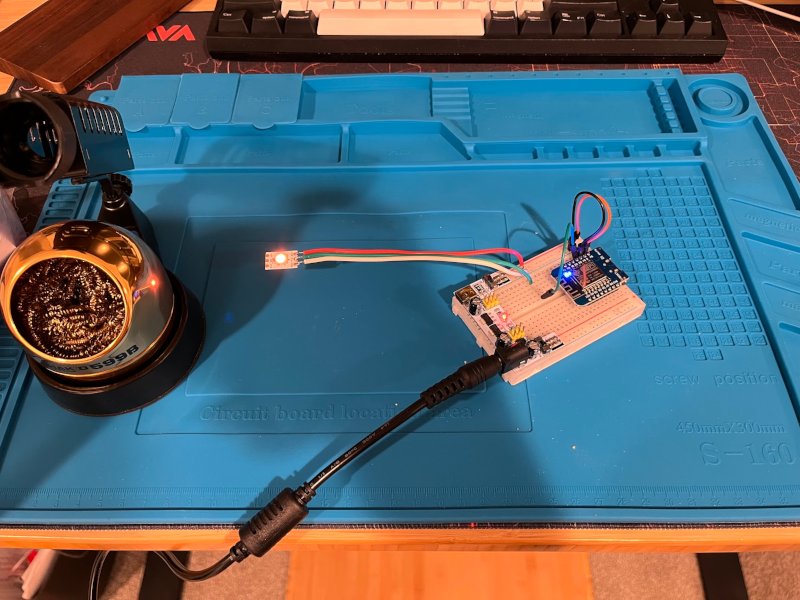
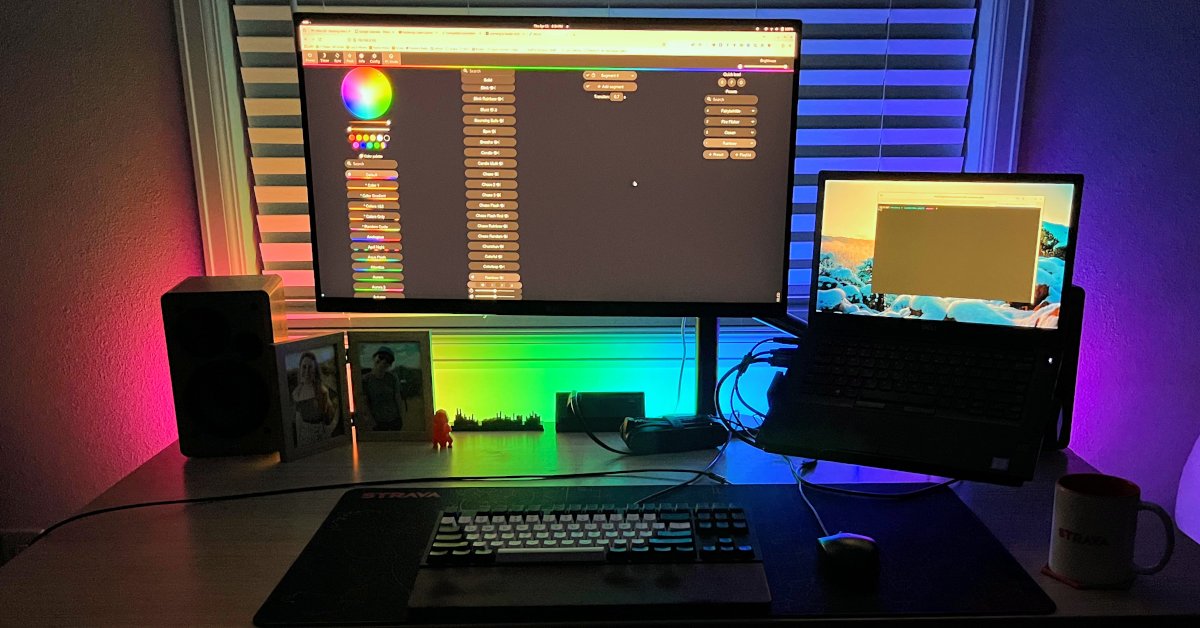
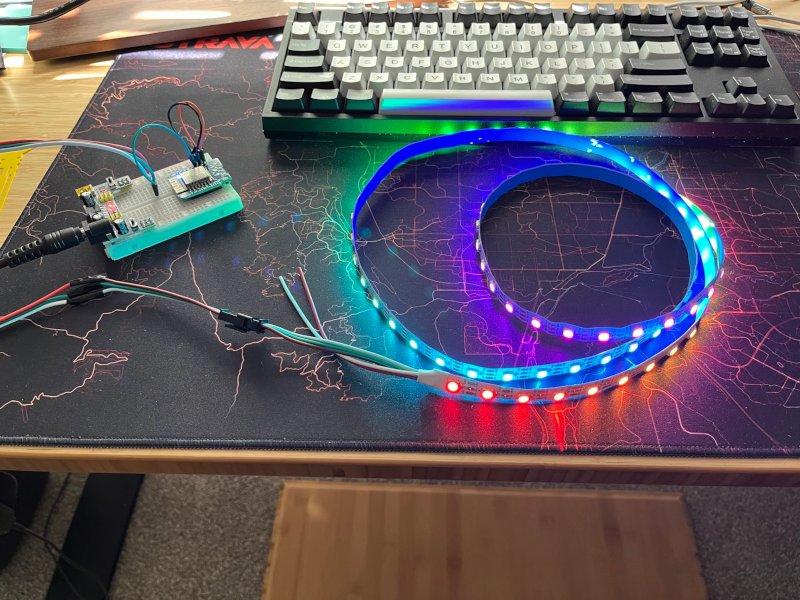
After confirming that my prototype worked with a single LED, the only thing left to do was connect a full LED strip. I left my single LED in place as a sacrificial pixel and soldered longer wires to its output to connect my full LED strip. Everything works, and the LEDs look great along the back of my desk, lighting up the wall! Now that I’ve confirmed the setup works, I’ll probably buy some aluminum channels to preserve the longevity of my LEDs (by managing heat) and increase the safety of the setup.
Overall, this was a really fun project! I was initially overwhelmed by information as I discovered that LEDs and DC circuits are actually way more complicated that I imagined, but it was fun to learn. I had a great time learning to solder, and I feel more confident in my ability to tackle projects like this in the future. But I also know I’ve barely scratched the surface of working with DC electronics and I have a lot more to learn! Knowing what I know now, I’d only recommend working with an ESP8266 dev board like I did if you have a desire to build your own circuit from scratch (and learn a lot along the way). If you just want the easiest solution to power and control an LED strip with WLED, I think some pre-built hardware like the dig2go from QuinLED is much easier (if you can find it in stock), and I might go with something more like that on my next project depending what my needs are. I love having WLED-powered LEDs at my desk that I can control from my computer, and it’s fun to know that I built them from scratch myself!
Bill of Materials
Want to build your own WLED setup? Here’s a list of the parts I ended up using. Of course, some parts might be slightly different for your project – you should run your own power calculations to determine the best size power supply and wires, for example.
About the Author

👋 Hi, I'm Mike! I'm a husband, I'm a father, and I'm a staff software engineer at Strava. I use Ubuntu Linux daily at work and at home. And I enjoy writing about Linux, open source, programming, 3D printing, tech, and other random topics. I'd love to have you follow me on X or LinkedIn to show your support and see when I write new content!
I run this blog in my spare time. There's no need to pay to access any of the content on this site, but if you find my content useful and would like to show your support, buying me a coffee is a small gesture to let me know what you like and encourage me to write more great content!
Related Posts
- Learning to Program by Making a Game 06 Dec 2020
- SkillsUSA 2008 Nationals 30 Jun 2008
- Loft Bed 08 Aug 2009