How to Dual-Boot Ubuntu (16.04 - 22.10) and Windows (10 or 11) with Encryption
When you run the Ubuntu installer, there’s an option to dual-boot Ubuntu with an existing Windows installation. There’s also an option to encrypt your Ubuntu installation, but only if you erase everything and install ubuntu. There’s no automatic way to install Ubuntu alongside Windows 11 with encryption. And while there are plenty of tutorials for dual-booting Ubuntu and Windows, many of them are outdated – often referencing an MBR partition table – and almost none of them seem to address encrypting your Ubuntu partition.
Dual-booting with encrypted storage should not be this hard in 2020.
–Me, while figuring out how to do this.
In reality, once you figure it out, it’s not that hard. The tricky thing is that this isn’t well-documented anywhere! So I’m hoping to fix that with this tutorial blog post. Honestly, if you know enough about Ubuntu to set up a dual-boot with Windows, it’s only a little bit harder to do it with encryption. I prepared this tutorial on a Dell Latitude e7450, fine-tuned it on my Dell Precision 5510, and I’ve had others confirm it works on a range of devices from both Dell and other manufacturers. So it should work with almost no modification on most Dell systems, and with only minor modifications (particularly around BIOS setup) on most other types of computers.
References
To write this guide, I compiled information from several sources. Here are some of the most useful references I found:
- XPS 15 9560 Dual-Boot with Encryption Notes, by luispabon. I followed these notes pretty closely, but modified some partition sizes and names based on other guides.
- XPS 15 9570 Dual-Boot with Encryption Notes, by mdziekon, upon which the above is based.
- Full Disk Encryption HowTo 2019, from the Ubuntu Community Wiki. This is a great resource, but deals with encryption without dual-booting.
- Manual Full System Encryption, from the Ubuntu Community Wiki. This is longer, and isn’t focused on dual-booting, but provides great details on the way certain things work.
I’ve also received responses to this post from some people who wrote their own notes:
It is worth noting that this method doesn’t encrypt /boot. While there are
valid reasons for encrypting /boot, the graphical installer does not encrypt it
when you do a graphical install with LUKS. As such, I’m matching that precedent,
and keeping the simplicity of an unencrypted /boot partition. Thus, the guide
I’ve compiled below is just about the simplest way to have a LUKS encryption
with dual-boot.
Why encryption is important
I began using encrypted storage on all my personal computers 5 or 6 years ago after noticing that all the companies I’d worked for required it, and had good reason to. Laptops get lost and stolen all the time. They’re high-value items that are small and easy to carry. And when a thief gets your laptop, there’s tons of valuable information on it that they can use or sell. Even if you use a password to login, it’s easy for an attacker to gain access to your data if your disk isn’t encrypted – for example, by using a live USB stick. And once they have that data, they might get access to online accounts, bank statements, emails, and tons of other data. For me, an encrypted hard disk isn’t optional anymore – it’s a necessity.
An Overview
So what are we going to do? This tutorial will help you set up a system to
dual-boot Ubuntu and Windows. The system will use a GPT hard disk
with UEFI (your BIOS must support UEFI). The Ubuntu partition will be encrypted
with LUKS.1 The Windows partition can optionally be encrypted with BitLocker.
I’m going to keep the Ubuntu installation as close to a “default” installation
as possible – no fancy tricks like a separate /home partition, but it should
be somewhat easy to add that yourself if you really want to.
I’m going to start with a blank hard disk, installing both Windows 11 and Ubuntu
from scratch. If you already have Windows installed and you want to keep it, you
should be able to shrink your Windows partition instead of erasing your hard
disk at the end of phase 1, and skip phase 2 (installing Windows) entirely.
Beware that when you rejoin us in phase 3, your partition numbers might be
different from ours, so you should run sudo sgdisk --print /dev/sdx to make
sure you understand your partition table.
To give you a broad overview of where we’re headed, here’s what we’re going to do:
- Prepare installation media and computer
- Install Windows 11
- Create an encrypted partition for Ubuntu
- Install Ubuntu
Of course, as with any new OS installation, you should back up any important data before proceeding. The instructions below will erase all the data on your hard disk. Proceed at your own risk; I’m not responsible for any damage or data loss.
Partition Names
My computer uses /dev/sda as the primary disk. Yours might be
different, and you should figure out what it is. For example, you might have
/dev/sdb or /dev/nvme0n1. One way to figure out what
yours is called is to run lsblk and look at the disk size. You're
looking for the disk (like /dev/sda or /dev/nvme0n1),
not the partition (like /dev/sda1/dev/nvme0n1p1/dev/sda with your device name
(/dev/sdx) so it's easier for you to read.
Device Name:
Phase 1: Prepare installation media and computer
Since we’re installing both Windows 11 and Ubuntu from scratch, we’ll need a USB stick for each. If you don’t already have a computer running Ubuntu or Windows, making the installation media will be a little harder – but there are tutorials for that and I’ll let you figure it out on your own.
Ubuntu 23.04+ uses a new
installer that does not yet support /dev/mapper when choosing
the manual partitioning option. You need to use the "Legacy Desktop Installer"
ISO to use these instructions with Ubuntu 23.04 or 23.10, but I'd recommend just
using the new installer with the new version of this guide.
Ubuntu 24.04+ does not include the legacy installer. You must use the new version of this guide.
- Create a Windows Installer USB stick. The easiest way is to use the Windows Media Creation Tool from a computer that’s already running Windows. Any method that works for you is fine.
- Create an Ubuntu USB stick. The easiest way is to download the ISO and use the Startup Disk Creator on a computer that’s already running Ubuntu.
Great! We’ve got our USB sticks ready to go! One final thing before we get started – we need to make sure our BIOS is set up correctly. In particular, we want to make sure we’re using UEFI to boot our OS.2
- Ensure your computer is running the latest BIOS available. This is important because an out-of-date BIOS can have bugs, and those bugs sometimes affect things like UEFI, non-Windows operating systems, or other components we’ll be touching.
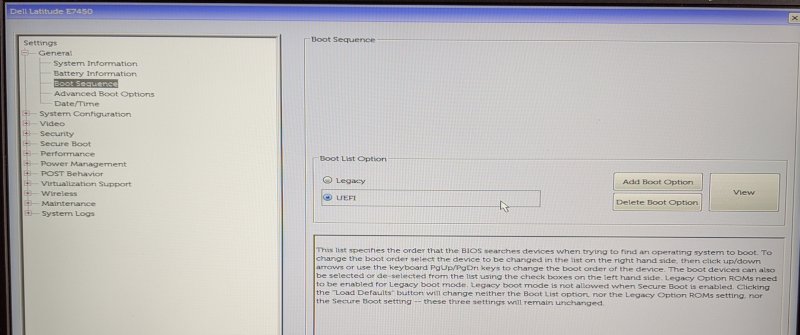
- Edit your BIOS settings. The following names are probably specific to Dell
BIOS, but other manufacturers will have similar settings.
- Under
GeneralandBoot Sequence, make sure yourBoot List Optionis set toUEFI. - Under
GeneralandAdvanced Boot Options, I disabledLegacy Option ROMs. It’s important that both OSes install in UEFI mode. (You can probably enable this when installation is complete if you care.) - Under
Security,TPM Securitymust be enabled if you want to easily set up BitLocker in Windows.
- Under
Now that our BIOS is configured for UEFI, we’re going to set up our hard disk.
For this tutorial, your BIOS must support UEFI!
Most modern computers support this, but if yours doesn't this tutorial won't work for you. You might consider these alternatives:
- Installing only Linux with encryption using the graphical installer.
- OR Installing only Windows with encryption.
- OR Dual-booting Linux and Windows without encryption using Ubuntu's graphical installer.
- OR Finding another tutorial or figuring out how to do this with an MBR disk.
- Completely erase your hard disk and set it up for UEFI by doing the
following.3
- Boot your Ubuntu USB stick and use
Try without installing(or just close the installer window). - Open a terminal. Make it fullscreen while you’re at it.
-
Run the following commands. This will initialize the drive as a GPT drive and create a 1G EFI system partition formatted as FAT32. (See here if you’re not working with
/dev/sdx.)$ sudo su # sgdisk --zap-all /dev/sdx # sgdisk --new=1:0:+1G /dev/sdx # sgdisk --change-name=1:EFI /dev/sdx # sgdisk --typecode=1:ef00 /dev/sdx # mkfs.fat -F 32 /dev/sdx1
- Boot your Ubuntu USB stick and use
OK, phase 1’s complete. We have our installation media ready to go and the computer’s BIOS and hard drive are set up correctly. Next, we’ll install Windows.
Phase 2: Install Windows
In this phase, we’re going to install Windows. Note that when we do this, we’re going to leave some unallocated space to install Linux later. This is a good approach because the Windows installer will mess with our partitions a little bit, and its easier to let it do so before finalizing our Linux partitions.
- Boot from your Windows Installer USB stick.
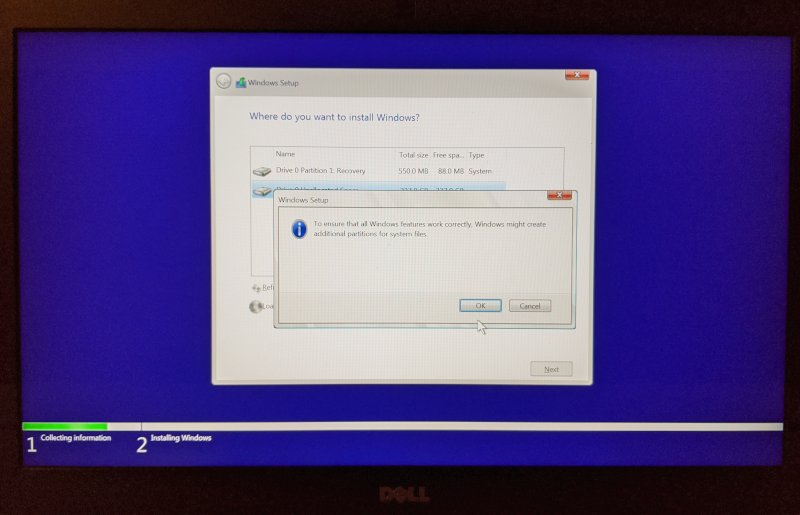
- Choose a
Custom (advanced)install to get to the Windows partitioning tool. - Create a new partition. The size of this partition should be the amount of disk space you want to use for Windows. In this example, I did 80G since the SSD on my computer is relatively small. If unsure, do about half of your hard disk.
- Windows will warn you that it is going to create an extra system partition. This is good.4
- Install Windows onto the partition you just made. There’s no need to format any partitions – the Windows installer will take care of that for you.
- When the Windows installation is finished, log in and enable BitLocker on
drive
C:. This will automatically create yet another partition on your disk (a Windows recovery partition) - which is why we’re doing it before partitioning for Ubuntu.
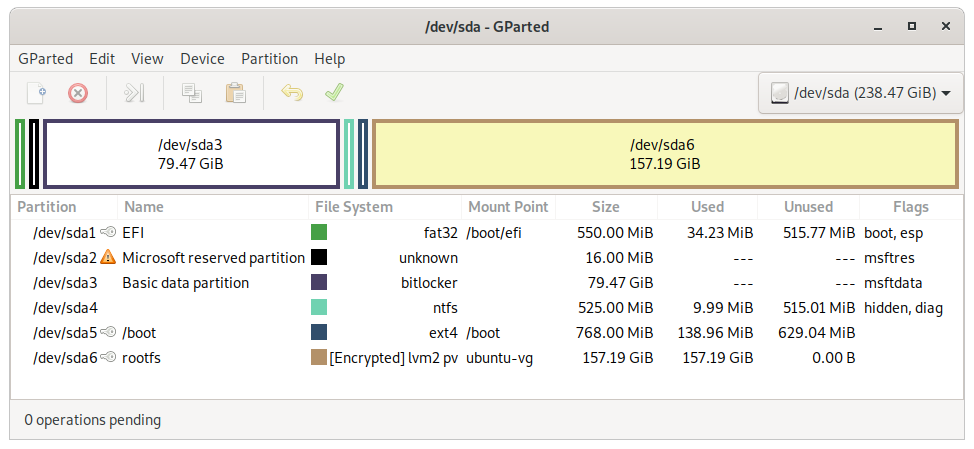
At this point, you can start using Windows. But I’d avoid doing too much setup or personalization yet so you don’t have to do it again if something goes wrong below. If you want to double check your partitions, this is what you’ll be left with after installing Windows and enabling BitLocker:
ubuntu@ubuntu:~$ sudo sgdisk --print /dev/sdx
Disk /dev/sdx: 500118192 sectors, 238.5 GiB

Number  Start (sector)    End (sector)  Size       Code  Name
   1            2048         1128447    1.0 GiB    EF00  EFI
   2         1128448         1161215    16.0 MiB   0C01  Microsoft reserved ...
   3         1161216       167825076    79.5 GiB   0700  Basic data partition
   4       167825408       168900607    525.0 MiB  2700
Phase 3: Partition the drive for Ubuntu
This is the trickiest phase since this is where we need to manually set up our encrypted disks for Ubuntu. We’re going to make it work very similar to the way the Ubuntu installer would set things up if you encrypted your whole disk.
Throughout this section, I’m going to be referencing sgdisk commands. You
could use gdisk if you’re comfortable with it and want an interactive
interface, or you could use GParted or Disks (in Gnome) if you prefer. sgdisk
commands are just easier to reference in a tutorial.
If you want, you can run sudo sgdisk --print /dev/sdx to examine the partition
table before moving on. You’ll see multiple partitions created by the Windows
installer, and should see some empty space where we’re about to install Ubuntu.
(If your disk isn’t /dev/sdx, see here.)
- Again, boot the Ubuntu USB stick and
Try without installing(or just close the installer window). - Open a terminal. It’s a good idea to make it fullscreen. We’ll use root here
(
sudo subelow) and use the same terminal for the rest of our commands. (Anywhere you see the#prompt, you should be at a root terminal.) -
Make a partition for
/bootand a partition for our Linux system & data (to be encrypted with LUKS).$ sudo su # sgdisk --new=5:0:+2G /dev/sdx # sgdisk --new=6:0:0 /dev/sdx # sgdisk --change-name=5:/boot --change-name=6:rootfs /dev/sdx # sgdisk --typecode=5:8300 --typecode=6:8300 /dev/sdx # mkfs.ext4 -L boot /dev/sdx5
Now, we’re going to encrypt our Linux data partition.
-
Setup LUKS on our Linux data partition.
# cryptsetup luksFormat --type=luks2 /dev/sdx6 WARNING! ======== This will overwrite data on /dev/sdx6 irrevocably. Are you sure? (Type uppercase yes): YES Enter passphrase for /dev/sdx6: Verify passphrase: # cryptsetup open /dev/sdx6 sdx6_crypt Enter passphrase for /dev/sdx6: # ls /dev/mapper/ control sdx6_crypt -
Setup LVM inside our encrypted partition for a data volume and swap space. It’s good that our swap space is inside the encrypted partition because data could be there when the system suspends. Also, for suspend/hibernate to work, you should have at least as much swap space as memory. My laptop has 8G memory, so I’ll create 8G swap space.5
# pvcreate /dev/mapper/sdx6_crypt
Physical volume "/dev/mapper/sdx6_crypt" successfully created.
# vgcreate ubuntu-vg /dev/mapper/sdx6_crypt
Volume group "ubuntu-vg" successfully created
# lvcreate -L 8G -n swap_1 ubuntu-vg
Logical volume "swap_1" created.
# lvcreate -l 100%FREE -n root ubuntu-vg
Logical volume "root" created.
Now, all our partitions are prepared. Don’t stop here! Continue to the next phase without exiting the Ubuntu live environment.
Phase 4: Install Ubuntu
- Run the Ubuntu installer from the Desktop, and choose
Something elseto configure partitions yourself.- Use our ~2G partition as
ext4with mount point/boot - Use
/dev/mapper/ubuntu--vg-rootasext4with mount point/ - Use
/dev/mapper/ubuntu--vg-swap_1as swap - The bootloader device should be
/dev/sdx(though it appears that this setting might not actually be used in UEFI mode)
- Use our ~2G partition as
- When the installer is finished, hit
Continue Testing. We have to do a couple more things before we restart. - Set up
etc/crypttab. This is what will allow you to unlock your encrypted drive by typing in your passphrase when booting.- Use the
blkidcommand to find the UUID of the partition you set up with LUKS. Note that you want the UUID, not the PARTUUID. We’ll use this UUID in step 3 below.sudo blkid /dev/sdx6 -
Get into a chroot in the newly installed system. The commands below mount our decrypted partitions into
/targetso we can install Ubuntu there.# mount /dev/mapper/ubuntu--vg-root /target # mount /dev/sdx5 /target/boot # for n in proc sys dev etc/resolv.conf; do mount --rbind /$n /target/$n; done # chroot /target # mount -a -
Inside your chroot (that is, in the same terminal), set up
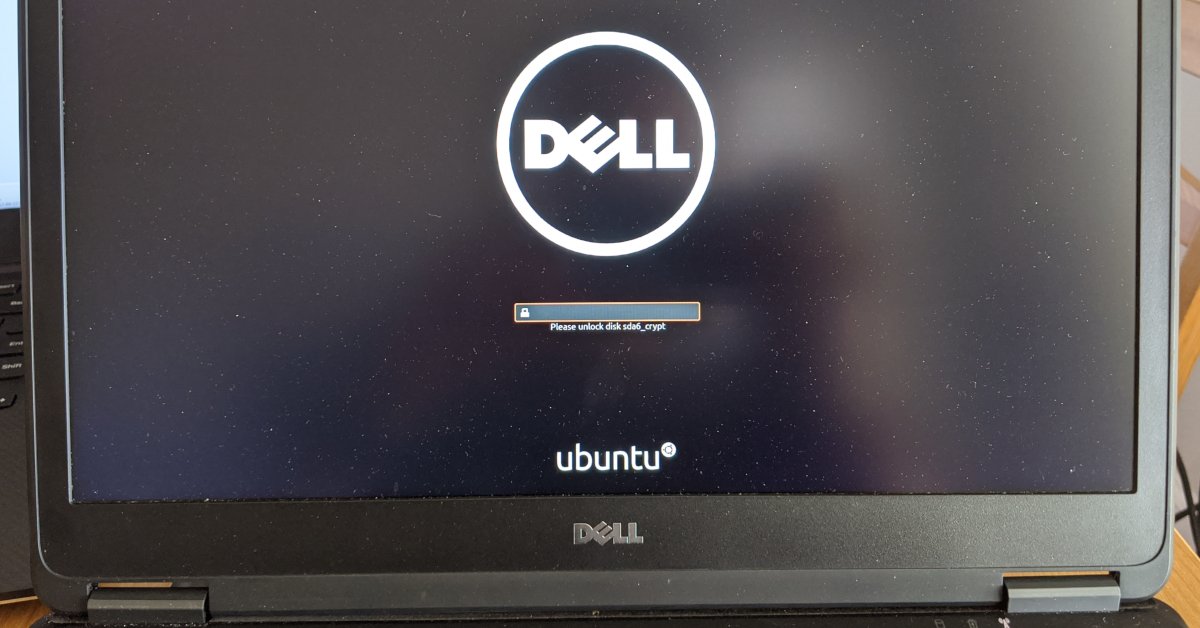
/etc/crypttab. Use your favorite editor to edit this file. I’ll use vi.sudo vi /etc/crypttabSave the following file contents, replacing the UUID with your actual UUID you found in step 3.1 above.# <target name> <source device> <key file> <options> # options used: # luks - specifies that this is a LUKS encrypted device # tries=0 - allows to re-enter password unlimited number of times # discard - allows SSD TRIM command, WARNING: potential security risk (more: "man crypttab") # loud - display all warnings sdx6_crypt UUID=abcdefgh-1234-5678-9012-abcdefghijklm none luks,discard -
Run the following to apply the changes you just made. (Still in the chroot.)
# update-initramfs -k all -c
- Use the
Done! Congratulations, you’ve created a dual-boot system with Ubuntu 23.10 and Windows 11 with all your data encrypted! Now that both installations are finished, you can reboot your computer.
By default, your computer will boot into grub, which can boot Ubuntu. Although
Windows is listed in grub, booting Windows from grub with BitLocker enabled
won’t initially work because the system’s TPM will detect a change in the boot
sequence. The easiest way to avoid this problem is to boot Windows directly
from your computer’s BIOS boot menu – usually accessible by pressing F12 on
startup. If you prefer to boot into Windows from grub, I’ve been told you can
make this work by booting into Windows from grub, entering the encryption key
when prompted, suspending
BitLocker,
and rebooting into Windows via grub again. And if you want to access the Windows
BitLocker drive from Linux, this should also be possible with the recovery key.
As a reference, here’s the final state of my hard drive (with 2 logical volumes
on the rootfs partition for / and swap):
$ sudo sgdisk --print /dev/sdx
Disk /dev/sdx: 500118192 sectors, 238.5 GiB

Number  Start (sector)    End (sector)  Size       Code  Name
   1            2048         1128447   1.0 GiB     EF00  EFI
   2         1128448         1161215   16.0 MiB    0C01  Microsoft reserved ...
   3         1161216       167825076   79.5 GiB    0700  Basic data partition
   4       167825408       168900607   525.0 MiB   2700
   5       168900608       170473471   2.0 GiB     8301  /boot
   6       170473472       500118158   157.2 GiB   8301  rootfs
I hope you found this guide useful, and I hope full-disk encryption with Ubuntu becomes more popular and better-supported as a result! If you’ve found this helpful and it’s saved you some time, perhaps you’d like to buy me a coffee? No pressure, just a little way to say thanks if you feel like it 😊.
Changelog
This article has become quite popular in the four years since I originally wrote it! I’ve made some (minor) changes over that time to make it easier to use, and I’m going to document these changes here for clarity.
- 2024-05-20: Published a completely new revision of this guide for the new installer in Ubuntu 24.04+. (Thanks @_C_King_123.)
- 2024-04-12: Updated to note incompatibility with Ubuntu 24.04+ and recommend installing with Ubuntu 23.10.
- 2024-04-12: Recommend 1G for the EFI partition and 2G for
/boot, which is what Ubuntu 24.04 does by default. - 2024-04-12: Removed suggestion to disable Secure Boot. Disabling Secure Boot should not be required.
- 2024-01-09: Updated to confirm it works with Windows 11. (Thanks Jérôme Froissart.)
- 2023-10-06: Updated to recommend luks2 (used by Ubuntu 23.04 GUI encryption) over luks1. (Thanks to Michal Stanke.)
- 2023-05-15: Added notes about Ubuntu 23.04 and the legacy installer.
- 2022-06-21: Recommend 1800M instead of 1.8G for
/boot– the sgdisk command doesn’t work well with floats. - 2022-05-03: I’ve received reports of successful installs using the above instructions with Ubuntu 22.04.
- 2022-05-03: Recommend 1.8G instead of 768M for the
/bootpartition. While 768M is recommended in some other guides and won’t typically cause problems, a clean Ubuntu 22.04 install uses a 1.8G/bootpartition. - 2022-05-03: Added reference from bjohas.
- 2021-10-24: Added note about suspending Bitlocker to reset it after modifying the bootloader.
-
Ubuntu supports other types of encryption. But home folder encryption can cause lots of problems and incompatibilities. And the cryptsetup manpages recommend LUKS over plain dm-crypt. ↩
-
Booting in UEFI is important for this process to work. There’s an in-depth discussion of boot modes on the Ubuntu community wiki. ↩
-
Here’s a good resource for UEFI info. ↩
-
According to the sgdisk man pages, “If Windows is to boot from a GPT disk, a partition of type Microsoft Reserved (sgdisk internal code 0x0C01) is recommended. This partition should be about 128 MiB in size. It ordinarily follows the EFI System Partition and immediately precedes the Windows data partitions.” ↩
-
There’s a good discussion of suspend modes on the Ubuntu community wiki, highlighting the need for swap space. ↩
About the Author

👋 Hi, I'm Mike! I'm a husband, I'm a father, and I'm a staff software engineer at Strava. I use Ubuntu Linux daily at work and at home. And I enjoy writing about Linux, open source, programming, 3D printing, tech, and other random topics. I'd love to have you follow me on X or LinkedIn to show your support and see when I write new content!
I run this blog in my spare time. There's no need to pay to access any of the content on this site, but if you find my content useful and would like to show your support, buying me a coffee is a small gesture to let me know what you like and encourage me to write more great content!
You can also support me by visiting LinuxLaptopPrices.com, a website I run as a side project.