How to Dual-Boot Ubuntu 24.04 - 24.10 and Windows (10 or 11) with Encryption
Dual-booting Ubuntu and Windows with encryption for both has been possible for a long time, but has always been difficult. Until recently, the Ubuntu installer supported encrypting Ubuntu (with LVM) or dual-booting with Windows, but never supported automatic partitioning for encrypted dual-boot – and therefore required manual LVM partition setup to achieve encrypted dual-boot. I wrote a long blog post back in 2020 (How to Dual-Boot Ubuntu and Windows with Encryption) that describes the complicated steps necessary to set up an encrypted LVM partition for encrypted dual-boot. In Ubuntu 24.04+, things are much easier because the installer supports dual-booting and using encryption simultaneously without resorting to manual partitioning!
I wrote that original blog post because I couldn’t find any good documentation about how to dual-boot Ubuntu and Windows with encryption, and even though the new installer makes the process easier I think the lack of documentation is still a problem I can help solve. So I’m completely re-writing my guide here to document the process for the new installer in Ubuntu 24.04+. If you’re familiar with my original guide, you’ll find that a few bits are the same, but the overall process is substantially shorter and simpler because the Ubuntu 24.04 installer can now handle most partitioning for you! I hope this tutorial blog post will help you achieve dual-boot Windows (10 or 11) and Ubuntu (24.04+), with both encrypted. With the right instructions, this isn’t difficult – only a little bit harder than a normal (non-encrypted) dual-boot. Like my previous dual-boot guide, I tested this on a Dell Latitude e7450, but I expect it to work on pretty much any computer with UEFI.
Tl;Dr (Instructions)
In Ubuntu 24.04+, the installer is (finally) capable of automatically shrinking a Windows partition and installing Ubuntu to an LVM encrypted partition automatically. But the installer UI is misleading, and we’re only able to achieve this via a quirk in the installer. It’s unclear to me at this point in time if we’re using intentional functionality (with terrible UI design) or unintentional functionality that happens to work. In either case, here’s the procedure for getting encrypted dual-boot with the Ubuntu installer.
- Windows should already be installed.
- Run the Ubuntu installer. Go through the initial installer screens to choose your language and set up internet access. Choose an interactive install process, and select the software you want to install as you continue through the installer wizard.
-
When you get to the
Disk setupstep, selectErase disk and install Ubuntu. Hit theAdvanced features...button, and selectUse LVM and encryption, and hit OK to close the pop-up window. Now change your selection back toInstall Ubuntu alongside Windows Boot Manager. (Note thatUse LVM and encryptionremains listed in the UI even though theAdvanced features...button is disabled. Through this UI quirk, we’re able to use the LVM encryption advanced feature and select the dual-boot radio button, and the installer will do what we want despite the odd UI.)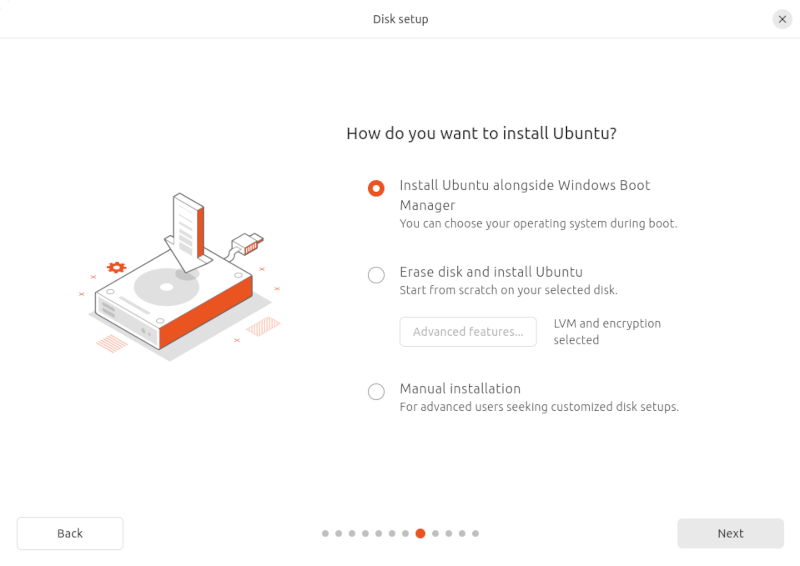
-
Click
Nextand finish the installer, completing the steps to choose a password and setup your user account.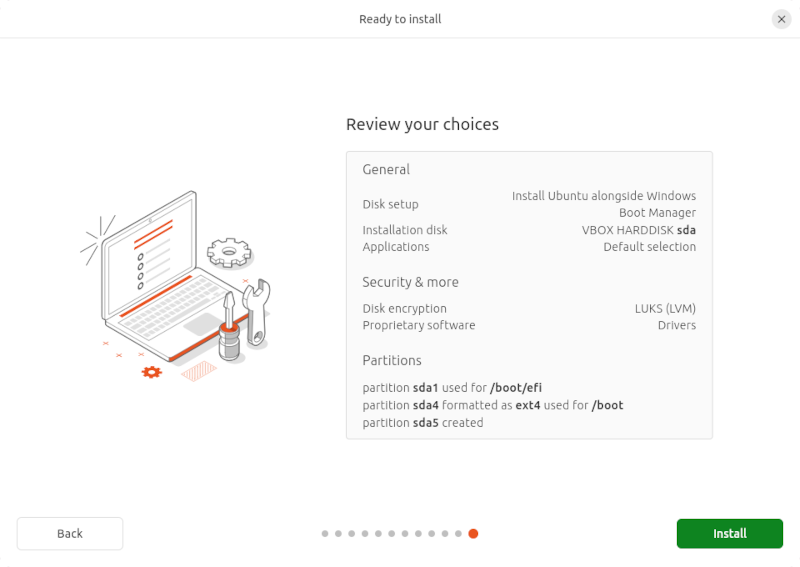
- After Ubuntu finishes installing, you have an encrypted Ubuntu partition. Boot into Windows and enable BitLocker to encrypt the Windows partition.
That’s it! Congratulations, you have a dual-boot system where Ubuntu is encrypted with LVM (LUKS) and Windows is encrypted with BitLocker. Compared to previous versions of Ubuntu this process is much less tedious, and I’m excited and grateful for the work of everyone who contributed to the new Ubuntu installer!
Important Notes
The process is really straight-forward since the Ubuntu installer does all the hard parts. Still, there are a few places you might get stuck along the way. Hopefully these notes help.
- As with any new OS installation, you should back up any important data before proceeding. These instructions will modify partitions on your hard disk and could result in data loss. Proceed at your own risk; I’m not responsible for any damage or data loss.
- Your BIOS must be configured to boot with UEFI.
- Windows BitLocker must be turned off when Ubuntu is installed. The primary reason for this is the Ubuntu installer can’t shrink an encrypted Windows partition, but the installer won’t let you proceed, even if it doesn’t need to shrink any partitions, if BitLocker is enabled.
- Make sure you save your BitLocker recovery key before rebooting, and consider selecting the checkbox to test BitLocker when setting it up. There’s a chance your boot sequence will prevent BitLocker from automatically unlocking the drive and you’ll need the recovery key.
- If BitLocker repeatedly requires the recovery key after rebooting (or fails to the system test before starting encryption), try booting directly into Windows from your UEFI BIOS boot menu (e.g. on a Dell, hit F12 during boot to bring up the boot menu) rather than using Ubuntu’s Grub bootloader when booting Windows. Inserting Grub into the boot sequence can mess with BitLocker.
- If you’re using your BIOS (rather than Grub) to boot Windows, you should also be able to adjust the boot order in your BIOS if you prefer to boot Windows by default.
- If you want to access the Windows BitLocker drive from Linux, this should be possible with the recovery key.
Additional Details
If you’re comfortable with all the above, you might not need any additional information. But I think the details below will help some people who either need additional help with some steps, or are curious about some of the more advanced details.
BIOS Setup
Before starting, ensure your computer is running the latest BIOS available. This is important because an out-of-date BIOS can have bugs, and those bugs sometimes affect things like UEFI, non-Windows operating systems, or other components we’ll be touching.
You should also ensure your BIOS Boot List Option is set to UEFI. While
you’re looking at BIOS settings, it’s worth noting that TPM Security is
required for BitLocker in Windows.
For this tutorial, your BIOS must support UEFI!
Most modern computers support this, but if yours doesn't this tutorial won't work for you. You might consider these alternatives:
- Installing only Linux with encryption using the graphical installer.
- OR Installing only Windows with encryption.
- OR Dual-booting Linux and Windows without encryption using Ubuntu's graphical installer.
- OR Finding another tutorial or figuring out how to do this with an MBR disk.
Installing Windows
If Windows is already installed, just do the steps outlined above. The Ubuntu installer is capable of shrinking the Windows partition, and I’d recommend you just let it do so.
If Windows isn’t installed, you should install Windows first. Leaving extra space on the hard drive for Linux would be fine, but for simplicity I think it’s easiest to just do a normal Windows install followed by the steps above. The Windows partition will shrink quickly if it’s mostly empty. If you need a Windows USB stick, the easiest way to make one is to use the Windows Media Creation Tool from a computer that’s already running Windows.
Ubuntu USB Stick
The easiest way to make a bootable Ubuntu USB stick is to download the ISO and use the Startup Disk Creator on a computer that’s already running Ubuntu. If you don’t already have a computer running Ubuntu, you can use balenaEtcher to flash the image to the USB stick.
Final Partition Scheme
As a reference, here’s the final state of my hard drive after allowing the
installer to shrink my Windows partition and installing Ubuntu with LVM and
encryption. Note that your partition sizes might be different than mine based on
the size of your disk and the way you split it up, but the number of partitions
and their types should be the same. In the scheme below, partition (3) is C:
in Windows. Partitions (2) and (4) are used by Windows. Partition (5) is /boot
for Ubuntu and partition (6) is the encrypted LVM partition for Ubuntu.
$ sudo sgdisk --print /dev/sda
Disk /dev/sda: 976773168 sectors, 465.8 GiB

Number  Start (sector)    End (sector)  Size       Code  Name
   1            2048          206847   100.0 MiB   EF00  EFI system partition
   2          206848          239615   16.0 MiB    0C01  Microsoft reserved ...
   3          239616       157882367   75.2 GiB    0700  Basic data partition
   4       975652864       976771071   546.0 MiB   2700
   5       157882368       162076671   2.0 GiB     8300
   6       162076672       975652863   387.9 GiB   8300
Why Encryption is Important
I began using encrypted storage on all my personal computers about ten years ago after noticing that all the companies I’d worked for required it, and had good reason to. Laptops get lost and stolen all the time. They’re high-value items that are small and easy to carry. And when a thief gets your laptop, there’s tons of valuable information on it that they can use or sell. Even if you use a password to login, it’s easy for an attacker to gain access to your data if your disk isn’t encrypted – for example, by using a live USB stick. And once they have that data, they might get access to online accounts, bank statements, emails, and tons of other data. For me, an encrypted hard disk isn’t optional anymore – it’s a necessity.
Congratulations!
Congratulations, you’ve created a dual-boot system with Ubuntu 24.04 and Windows 11 with all your data encrypted! I hope you found this guide useful, and I hope full-disk encryption with Ubuntu becomes more popular and better-supported as a result! If you’ve found this helpful and it’s saved you some time, perhaps you’d like to buy me a coffee? No pressure, just a little way to say thanks if you feel like it 😊. Also, I’d love to hear from you if you validate these steps on different hardware (or if you notice any problems with the guide itself). The best way to reach me is on Twitter or via email.
I also owe some thanks to @_C_King_123, who pointed out to me that it is possible to do an encrypted dual-boot installation with the Ubuntu 24.04 installer, as I first saw documented here.
About the Author

👋 Hi, I'm Mike! I'm a husband, I'm a father, and I'm a staff software engineer at Strava. I use Ubuntu Linux daily at work and at home. And I enjoy writing about Linux, open source, programming, 3D printing, tech, and other random topics. I'd love to have you follow me on X or LinkedIn to show your support and see when I write new content!
I run this blog in my spare time. There's no need to pay to access any of the content on this site, but if you find my content useful and would like to show your support, buying me a coffee is a small gesture to let me know what you like and encourage me to write more great content!
You can also support me by visiting LinuxLaptopPrices.com, a website I run as a side project.