3 Months of 3D Printing
I got my first 3D printer about three months ago, and now that I’ve had it for a little while I wanted to write about my experience with it so far. Learning 3D printing has been a blast, but I faced some surprises and challenges along the way. It felt a bit like I was thrown into the deep end when I got started, but after about three months I finally feel like a have a good handle on the basics, and I’ve finshed several different kinds of projects. If you’re curious about 3D printing or thinking about getting into it yourself, maybe I can provide some inspiration and insight.
Thrown Into The Dep End
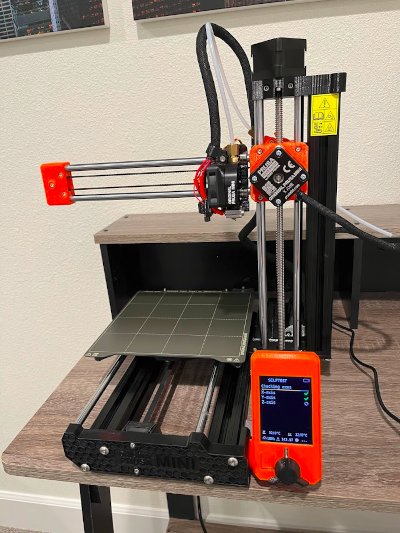
My wife got me a Prusa MINI+ 3D Printer for my last birthday. She got me the unassembled kit (which I asked for), so my first experience with 3D printing was figuring out how to build the darn thing. When I opened the box and saw hundreds of parts sorted into multiple stages of packets, I knew I had my work cut out for me. I’d imagined spending about an hour putting it together but this was going to take days.
Got a @Prusa3D Mini printer kit! Excited to get this put together! pic.twitter.com/YDY01jTW0J
— Mike Kasberg (@mike_kasberg) September 5, 2022
I assembled the printer in about six hours total, spread over the course of a week. I like to say this was my first experience with 3D printing because I’ve found that a lot of the things you do and challenges you face when you’re 3D printing are basically the same as when you’re assembling a precise machine from a bunch of small plastic parts. It seems quick and easy at a surface level but you quickly learn about all the minute details that are important. Perhaps another reason this assembly experience felt so representative of the 3D printing world is that the Prusa MINI itself is made largely from 3D printed parts. That’s right – this printer can (partially) print itself. (Its origins trace back to a project called RepRap, whose goal was to create a 3D printer that could clone itself.) So when you assemble a Prusa printer from a kit, you’re literally assembling 3D printed parts. And that’s exactly what you spend a lot of your time doing when you get into 3D printing.
Although I was initially overwhelmed by the sheer number of parts to assemble, I made progress by taking things one step at a time, and finishing the assembly began to feel more achievable once I got started. I learned several tricks along the way (like how to get metal nuts in the correct position inside plastic parts), and leaned heavily on my experience with hand tools (and a feel for things like screw and belt tension that can only really come from experience). In the end, it felt great to finish the assembly and know that I’d built something with my own hands. It felt a lot like building Ikea furniture, but more precise and complex.
Fun, Easy Prints
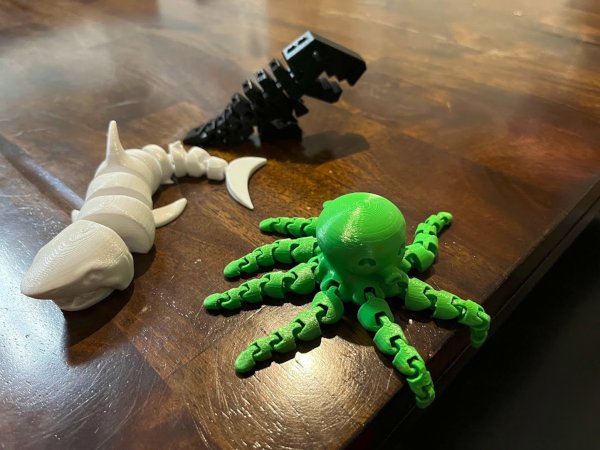
After getting the printer assembled and calibrated, I found some relatively simple prints to try. (This is probably where most people start if they buy an assembled printer.) I printed a cute mini octopus and a Flexi rex to give to my toddler. These were great prints to help me get acquainted with my printer since they’re print-in-place models. (No assembly required!) They printed relatively quickly and easily. It was cool to see how the printer is able to create a model that can have joints in it. And small, relatively simple prints like this were a great way to develop a deeper understanding my 3D printer and some of its quirks.
Assembly Required
When I first got my 3D printer, I didn’t know exactly what I’d be able to print but I was excited to find things to try. I’d heard that you could make 3D printed Nerf guns, and I thought it would be fun to give that a shot. Unfortunately, I quickly learned that it’s not as easy as it sounds. When someone says, “you can make a 3D printed Nerf gun,” you might (naievly) think you can just download a model from the internet, press print, and have a working gun several hours later. In reality, things are much more complex.
Even finding models to print was somewhat challenging. A quick search for “Nerf gun” on Printables.com yielded few good results. I found a mix of rubber band guns, Nerf gun mods (like scopes), and other accessories (like targets), but no 3D printable functional Nerf guns like I’d imagined. In my search, I learned about several other websites where you can download 3D models. Thingiverse.com seemed to have a wider selection of models than Printables.com, but still yielded few good results for Nerf guns. Lots of Google and YouTube searches helped me figure out where to find the models and information I was really looking for. There really are great 3D-printable high-performance Nerf guns out there if you know where to look. Captainslug has several great designs available on captainslug.com and Thingiverse. There are other creators as well – Frontline Foam’s STL file list shows many of the available designs. Ultimately, I chose to print and build a Zinc [2.0] from 118.design since it seemed relatively simple compared to many of the bigger guns, but also very well designed.
Building the Zinc Nerf blaster was an experience that felt a lot like assembling the Prusa MINI printer. Everything took longer and was more difficult than I’d anticipated. The gun is made from 14 printed parts. I rarely did more than one print per day (and some days didn’t have time to do any), so it took me more than two weeks just to print the parts I needed. Once all my parts were printed and I began assembling them, I discovered the assembly was more complicated than I imagined, and often required sanding parts or adding grease to make things fit right and operate smoothly. And this is true for 3D printing in general – many parts require sanding, tweaking, and assembly after they come off the printer. In the end, I probably spent nearly a month printing and assembling my Zinc blaster, but it did turn out really cool. It operates well and shoots faster than any Nerf gun you can buy off the shelf. It was a fun experience, but was also a huge time investment. I might print another Nerf gun one day, but next time I’ll prepare myself for a much bigger time commitment.
![My Zinc [2.0] dart blaster](/images/3-months-of-3d-printing/zinc.jpg)
Replacement Parts
Printable replacement parts tend to come up pretty often in conversations about 3D printing. It’s easy to imagine a world where a part for coffee machine breaks and you fix it with a 3D printed part without ever leaving your home. But in my experience, like a lot of other 3D printing ideas, this doesn’t work as well in practice as it does in your imagination. In practice, few parts are actually available. Random companies don’t just publish 3D files for all their parts. So unless you happen to be really lucky, you probably can’t find a file for the part you need. You might be able to design a part yourself, but (again) that’s a bigger time investment than you might expect.
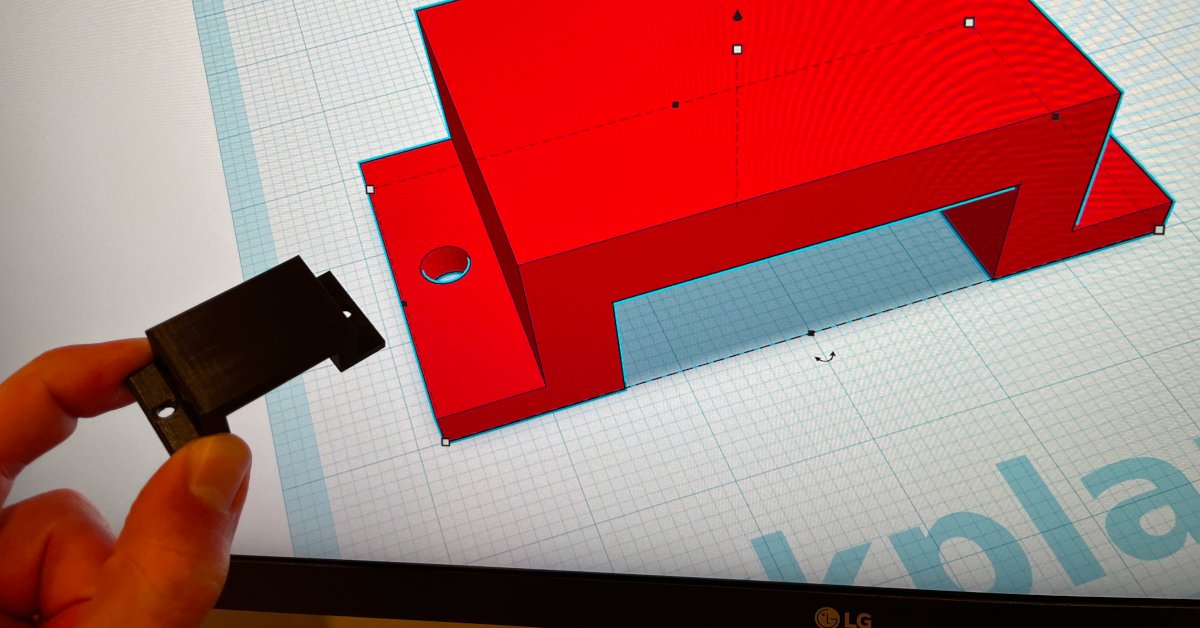
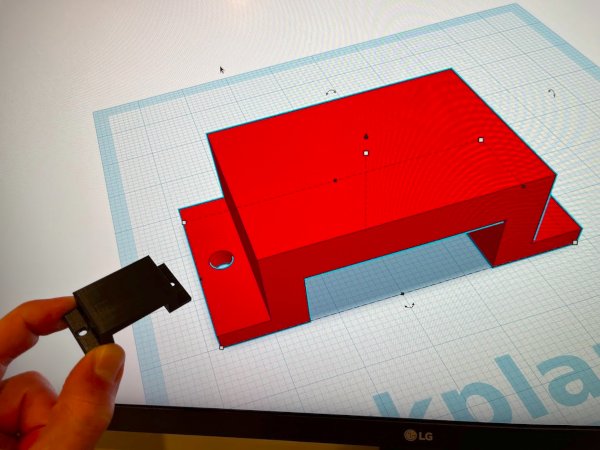
A few weeks ago, I designed and printed a 3D part from scratch for my first time. A little plastic clip had broken on one of my toddler’s toys, and I thought I might be able to make a replacement. The part was relatively simple, and modelling it from scratch seemed like a great way to try printing my own 3D model for the first time. I didn’t know where to start – I didn’t even know what software I could use to make files that would work with my printer. But I did some Googling and learned as I went. I ended up using Tinkercad to model my part, and it worked great. I think Tinkercad is a great program to start with because it’s simple and easy to learn but has just enough features that it can be pretty powerful too. (And of course, it’s free.) In Tinkercad, things work very much like they do in the real world, which makes it intuitive. You can combine simple shapes to make more complex shapes, and you can also remove material using simple shapes. I also recently discovered OpenSCAD, and plan on trying it next time I model something, but I only think I’ll be comfortable with it because of my programming background and it might be more difficult for non-programmers to work with.
While a lot of early adopters of 3D printing technology are technical enough to have the knowledge (and desire) to make their own models, I think this’ll become less true as 3D printing becomes more common. The average consumer will want to download a file and print it without thinking about the technical aspects, and might not have the knowledge (or desire to learn) to create their own models. So while it’s fun to imagine a world where you can download and print a replacement part for anything that breaks, I think that’s probably not likely any time soon. Still, we’re making progress in that direction, and I’m really excited to see how the brand profiles on Printables.com make it easier to find “open source” parts.
3D printing doesn’t (yet) fulfill the sci-fi fantasies of printing anything you want quickly and easily, without any extra work. But it still lets you do really cool things. With only 3 months of 3D printing experience, I’ve already created some really cool stuff. And I’m most excited that owning a 3D printer unlocks the ability for me to physically make anything I can imagine (as long as I’m willing to put in the work).
I do most of my 3D printing on a Prusa MINI, and after owning it for several
years I’ve been very impressed with Prusa as a company (very supportive of open
souce) and with the performance of my Prusa printer (it’s great, rarely needs
maintenance and does excellent prints). Want to get your own Prusa 3D printer?
If you use my referral code @mkasberg_363797 at checkout, we will both get
reward points!
About the Author

👋 Hi, I'm Mike! I'm a husband, I'm a father, and I'm a staff software engineer at Strava. I use Ubuntu Linux daily at work and at home. And I enjoy writing about Linux, open source, programming, 3D printing, tech, and other random topics. I'd love to have you follow me on X or LinkedIn to show your support and see when I write new content!
I run this blog in my spare time. There's no need to pay to access any of the content on this site, but if you find my content useful and would like to show your support, buying me a coffee is a small gesture to let me know what you like and encourage me to write more great content!
Related Posts
- 3D Printing with OpenSCAD 22 Mar 2023
- 3D Printing Map Figurines with GPS 17 Jul 2023
- 3D Printing the Strava Logo 27 Apr 2023