Home WiFi Upgrades: Adding an Access Point with Wired Backhaul
When we bought our house several years ago, our home wifi consisted of a cable modem and wireless router on the floor of our living room (where we happened to have a coax outlet). Over time, I’ve made a few improvements! Last year, I installed my own coax cable so I could move our internet equipment out of the living room. This was a great improvement overall, but led to bad coverage and slow speeds on my deck. To try to fix that, I got an RE-450 wifi range extender. The range extender improved the wifi on the deck, but didn’t work seamlessly with the rest of my network. So I planned some more improvements. I just finished installing some Cat-6 ethernet cable so I could add a wifi access point with a wired backhaul. I want to write this blog about how I did it, what kind of performance I got, and what I learned along the way. Maybe you can try something similar if you have wifi coverage problems in your own home!
WiFi Problems
To get a thorough understanding of the problems I was trying to solve, I think it’s important to understand a little about the layout of my house. We have a mostly-finished basement with an unfinished 10’x10’ mechanical room (with our furnace, water heater, and storage). Last year, I moved my modem and wifi router to this mechanical room, right next to my basement office. Our main level has a kitchen and a TV room, and the internet was great there. Our second story has only bedrooms. The internet was just okay in the master bedroom. It worked, but it was noticeably slower than other parts of the house. The other bedrooms were worse, with barely-working wifi. Our deck had similarly bad wifi, with the signal dropping intermittently.
I tried to fix these problems several months ago with the range extender. Perhaps it was just a problem with this particular model, but I was never able to get the range extender working well. Whenever I’d set it up to use the same SSID as my primary wifi network, clients would seem to get mixed up and connections would drop. Eventually, I gave up on using the same SSID. The range extender did work on a separate SSID, and I used it this way to get wifi on my deck. Unfortunately, though the range extender improved the overall coverage area, the speed was still mediocre, and I didn’t like the need to change wifi networks on the deck.

Planning a Solution
I suspected the reason I was experiencing dropped connections had to do with all the traffic between my computer, the range extender (with wireless backhaul), and my primary router. I also knew that (at least in theory) it was possible to set up a seamless wireless network with multiple access points, where clients would automatically choose the best access point – this is how corporate networks have great reception throughout a huge office building. A major difference between my range extender and those corporate networks was the “backhaul” (connection back to the primary router). My range extender used a wireless backhaul (because homeowners love the simplicity of just plugging in a device to fix their problems, even if it doesn’t work that well), but professional networks use wired backhaul for better performance and reliability. As far as I know, it’s very uncommon for a “professional” wifi network to use a wireless “mesh” or range extenders – it just isn’t cost-effective or practical compared to the simplicity of access points with wired backhaul. I decided to try setting up an access point with wired backhaul on my home network.

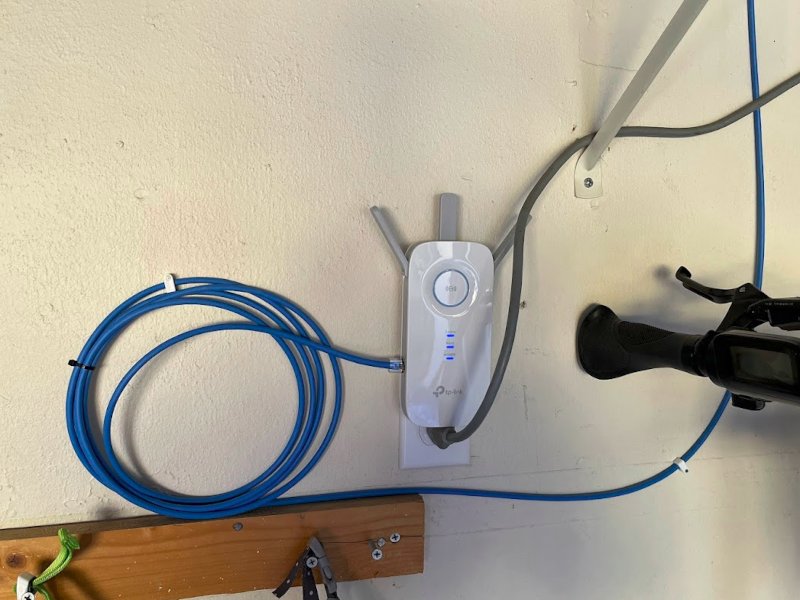
Fortunately, my range extender (an RE-450) can also function in access point mode! All I needed to do was run an ethernet cable to it! This is easier said than done. Our home isn’t wired with ethernet, and with a mostly-finished basement we have very limited access to run cables through the walls (since we can’t just fish them down through an unfinished basement). I needed to figure out where I could put a wifi access point and run ethernet to it. After mulling over the problem for several weeks, an idea occurred to me to run ethernet through our garage. Ethernet cable is low voltage, so it can be exposed (and it wouldn’t bother me to have a wire along the wall of my garage; we already had a couple others). My garage shares a small section of wall with my basement mechanical room. My garage has an available power outlet (which is necessary since my RE-450 isn’t PoE). And, luckily, my garage is somewhat centrally located near the part of the house with bad coverage – under my master bedroom and near the deck. I decided to run a Cat-6 ethernet cable from the wifi router in my basement mechanical room to a wifi access point on the far side of our garage!
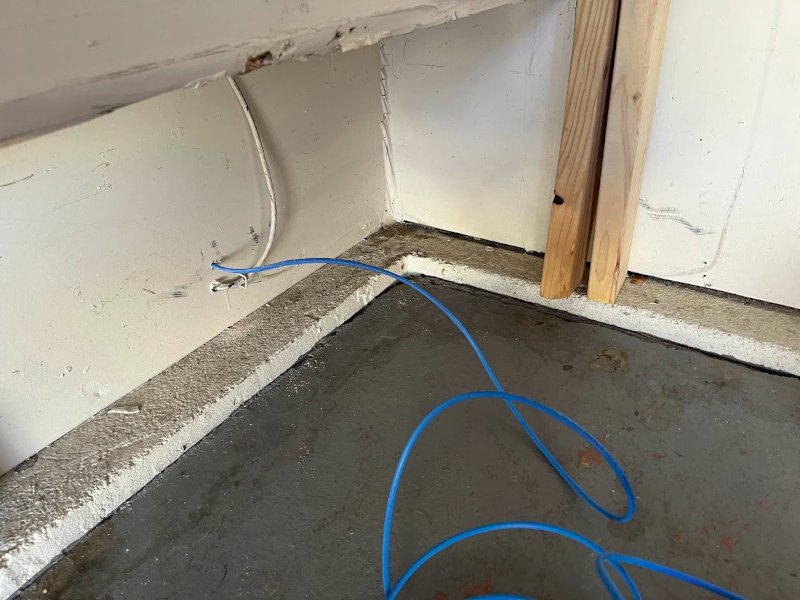
Installing Cat-6 Cable
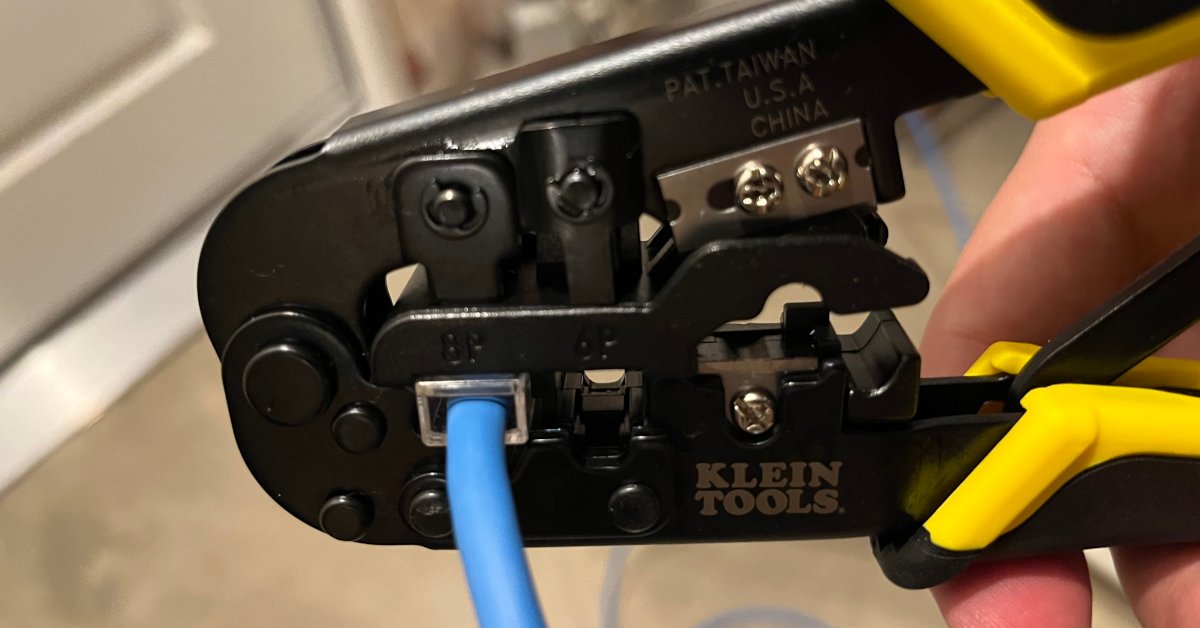
I had very limited experience running ethernet cable. (Though I did have an “internship” fifteen years ago terminating patch panels.) But coming off a success installing my own coax cable last year, I decided to give it a go. I opted for Cat-6 cable over Cat-5. For about 30% difference in price, it made sense to me to be more future-proof so I don’t need to rewire this in five years. I went to Home Depot and bought my supplies:
- 100 ft Cat-6 twisted pair cable ($32)
- Klein Tool Set with crimper ($50)
- RJ-45 Cat-6 plugs ($1/ea)
- (Optional) Klein LAN Explorer cable tester ($30)
- (Optional) Data cable staples
I bought the Klein Tool set above, though I didn’t need the punch tool since I wasn’t installing any jacks. I also opted for the traditional plugs rather than pass-through connectors. Either are fine – just make sure your plugs match the tool you use. At a fundamental level, all you need is Cat-6 cable, a plug for each end, and a crimping tool to terminate the ends. Depending on your particular needs, you might also want a drill (to route the cable through walls) or data cable staples (to attach the cable to walls). I also bought a cable tester to make sure I had a good connection to the plug with the ends in the correct order, but this isn’t strictly necessary.
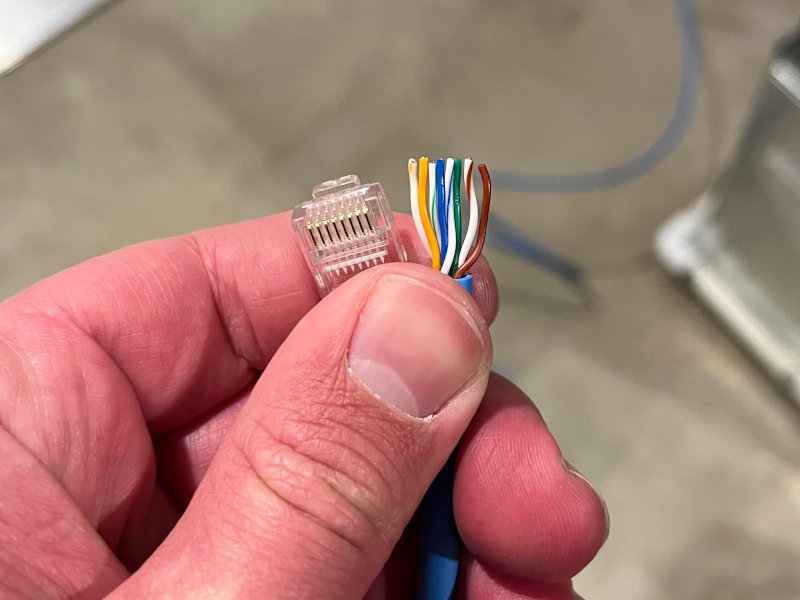
Terminating ethernet cable with a crimping tool might seem intimidating if you’ve never done it before, but it was actually one of the easier parts of this project! Terminating cable is nothing compared to figuring out how to route it through walls to the right spot. Just watch a five-minute YouTube video and make sure you put the wires in the correct order. If I figured this out, you can too!
Results and Lessons
I tested the changes I made to my wifi network by running this SSH command (to time the transfer of a 1GB file) from various points around my house before and after the changes.
$ ssh 192.168.0.1 'dd if=/dev/zero bs=1GB count=1 2>/dev/null' | dd of=/dev/null status=progress
My results are summarized in the table below. “Router” represents the wifi router in my basement (without the range extender). “Wired AP” is my new wifi access point with wired backhaul. And the deltas compare the new setup to the previous setups.
| Client Location | Router | Range Extender | Wired AP | Δ (vs Router) | Δ (vs Extender) |
|---|---|---|---|---|---|
| Basement Office | 48 MB/s | N/A | 48 MB/s | 1x | N/A |
| Master Bedroom | 28 MB/s | 27 MB/s | 55 MB/s | 1.9x | 2x |
| Far Bedroom | 14* MB/s | 25 MB/s | 46 MB/s | 3.3x | 1.8x |
| Deck | 2* MB/s | 19 MB/s | 38 MB/s | 19x | 2x |
*Connection unstable
I couple things jump out at me. It’s worth noting that while the range extender improved the connection in areas where it was previously unstable, it didn’t really make the connection any faster where the connection was already stable (in the master bedroom). But the same RE-450 in access point mode is almost twice as fast across the board to any area it can reach. (It also works great, without dropping connections, on the same SSID is my primary wifi router. Yay!)
I learned several things from this experience, and I think some of the lessons I learned will apply to anyone thinking about how to improve their home wifi.
-
A range extender (without a wired backhaul) is a simple solution that can work to make wifi available where it wasn’t before. For example, wifi didn’t work reliably on my deck without a range extender but did work with one. (I needed to use a separate SSID; YMMV depending on your equipment.)
-
An access point with a wired backhaul is almost always better than a wireless range extender. A wired AP doesn’t “waste” half its wireless bandwidth communicating with the primary wireless router.
-
My deck and master bedroom are roughly the same distance from my basement wifi router. But the master bedroom achieved 28 MB/s while the deck only got about 2 MB/s on the router alone. I think a big factor here is interference. There are only a couple walls and floors obstructing the signal to the bedroom, but the signal to the deck is obstructed (partially) by the ground and a concrete foundation. So when planning your wifi, you might need access points closer together than you think if there’s a lot of obstruction.
-
It’s worth knowing that while my ranger extender requires a power outlet even in access point mode, this isn’t always necessary. If you don’t have a power outlet available, some wireless access points can work via power over ethernet (PoE). If you use this, your router needs to provide PoE power, or you can inject power near the router.
-
If you ever have the opportunity to install ethernet wiring in the walls of your house (either as a new build or during remodeling), do it! Even if most devices are wireless, the ability to put a wired access point in various rooms would be a huge improvement to your network’s performance!
If you’re not satisfied with your home wifi speed and coverage, I think a wired access point should be high on your list of improvements to consider. While it might not be feasible in every situation, it can provide very good speed and coverage if there’s a way to run an ethernet cable back to the router. And if you have enough DIY chops to install the cable yourself, the wired access point can be very cost-effective!
What’s Next?
I’m pretty darn happy with my home wifi now – I have fast coverage everywhere, including very fast wifi in my bedroom and on my deck. 40+ MB/s (megabytes per second) is fast enough that my ISP is the limiting factor (at roughly 150 Mbps – megabits per second, or ~18 MB/s) rather than my home wifi. Still, I’m sure I’ll want to upgrade more in the future as new technology comes out. I’ve heard great things about Ubiquity, and would love to upgrade my router and access points to Ubiquity hardware one day!
About the Author

👋 Hi, I'm Mike! I'm a husband, I'm a father, and I'm a staff software engineer at Strava. I use Ubuntu Linux daily at work and at home. And I enjoy writing about Linux, open source, programming, 3D printing, tech, and other random topics. I'd love to have you follow me on X or LinkedIn to show your support and see when I write new content!
I run this blog in my spare time. There's no need to pay to access any of the content on this site, but if you find my content useful and would like to show your support, buying me a coffee is a small gesture to let me know what you like and encourage me to write more great content!
Related Posts
- How to Test and Optimize Your Home Wifi Coverage 28 Jul 2023
- I Installed My Own Coax Cable for My Internet Modem (and You Can Too) 22 Dec 2022
- Learning to Solder: A WLED Project 12 Apr 2024